Workshop Handout: Vegetable & Fruit Bottling
by FAadmin • November 30, 2014 • EAT Project, News, Courses & Events, Uncategorized
Written by Karin Shaw of Dragon Willows Farm: http://www.dragonwillowsfarm.co.uk/
 Most fruits and vegetables are able to be preserved by bottling.
Bottling is simply a way of sterilising the fruit or vegetable and sealing out air and thereby preventing bacteria making the produce deteriorate and go bad.
Traditionally ‘Kilner’ type jars comprising of a heat-proof glass jar, rubber seal, glass lid and metal screw on seal were used for bottling. However these are expensive to buy and unless you already have some of these jars, it is much more economical to use largish jam and/or pickle jars and really environmentally friendly to recycle and reuse these type of jars. Most of us will have access to used jars.
The priority in all cases is to ensure that the jars are very, very clean before use. To achieve this wash them in very hot water and washing up liquid and then dry up-side-down on a backing tray in a warm oven (100°C) for around 20 minutes. Then keep them upside down while they cool before use. Alternatively, they can be run through the hot wash cycle on a dishwasher.
Apart from the jars you will need lids – they will not take oven drying as the plastic sealant inside most lids will melt. Lids can be sterilised by immersing in a bowl of boiling water for a few minutes before using to seal the jars.
Also required for bottling is a large pan if you are planning to sterilise using the top of a cooker, or a roasting tin if you are going to use the oven. In either case you will also need something to place on the bottom of the pan/tin to prevent direct heat on the base of the jars, for example a wad of folded newspaper, some cloth, a folded tea-towel etc., or you may have a roasting tin or fish kettle which has a wire trivet in the bottom already.
You will also need a thermometer to check the temperature of the contents of the jars to ensure that the required sterilisation temperature has been reached.
A kitchen thermometer is worth the investment and does not need to be very expensive.
Method:
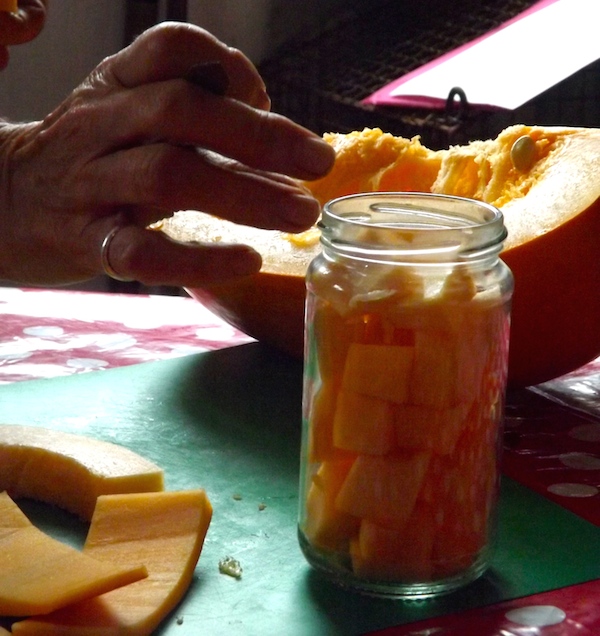
Small fruits and vegetables such as berries, peas, shelled beans, etc., can be bottled whole. Ensure the produce is clean and any stalks etc., have been removed. Large and or hard produce should be shelled/peeled where applicable and cut into junks that will fit easily into the jars. For example apples should be cored and cut into quarters. Carrots can be diced or sliced, runner beans should be de-strung and cut into chunky slices.
Fruits/vegetables that can be bottled whole but have skins, i.e., plums, tomatoes, gooseberries, need to have their skins pricked with a skewer before packing into the jars to ensure they do not burst open during sterilisation
Pack the fruits/vegetables into the jars (give them a little shake to ensure that the produce settles in the jar to get maximum fill.) For items like plums and tomatoes or chunkier vegetables it is sometimes helpful to use a long skewer or knitting needle to get them placed in the bottom of the jar.
Once packed fill the jars to within 1cm of the top with cold water. Place the full jars into the pan or roasting tin having first placed either folded cloth/newspaper etc., as described above into the bottom to stand the jars on.
Ensure that the jars do not touch the sides of the pan/tin or each other or there is a chance they will crack during heating.
Then fill the pan/tin with cold water to come half way up the jars in the case of the pan, and sufficient without over-filling in case of the tin.
Then heat up starting on low heat either on top or in the oven and slowing increasing the heat until sterilisation temperature (see below) is reached. Use the kitchen thermometer to check the temperature by inserting it into the centre of the contents in each jar.
Once sterilisation is complete (see timings below) remove pan/tin from heat and remove the jars (use oven cloves or cloth as jars will be hot) and place them on a flat surface on either a folded cloth or newspaper – DO NOT PLACE THE HOT JARS ON A COLD SURFACE AS THEY WILL CRACK.
Then seal them with the relevant lids. Place the jars in a cool, dark place to store. Check them ever so often. Any signs of fermentation (bubbles rising in the jar) can be stopped by emptying the jar into a pan and boiling the produce. It will however need to be used within a couple of days.
Other liquids can be used with the produce in the jars. Salt can be added to vegetables (approximately 1 teaspoon of salt to 1 pint of water). And a sugar syrup can be used for fruits (340 gms of sugar to 2 pints of water) – boil them together to make a syrup and then pour over the fruit in the jars.
The advantage of using plain water is that it is very economical and the produce can be flavoured with anything when it is used later – i.e., for soups, fruit puddings, pies etc.
Sterilisation Temperatures and Times:
Soft fruits and berries (raspberries, blackberries, strawberries etc.,) must be allowed to take 1½ hours to reach a temperature of 75°C and kept at that heat for 10 to 15 minutes.
Hard fruits and vegetables such as plums, apples, pears, beans, peas, carrots etc., should be allowed 1½ hours to reach 75°C and kept at that heat for 15 minutes.
Some of the harder vegetables will not necessarily be ‘cooked’ soft during sterilisation and cooking can be completed when the vegetable is eventually going to be eaten.
Soft fruits will almost certainly shrink in the jars during sterilisation and the jars should be topped up from one of the other jars being sterilised. This may result in a jar less than full at the end of the process and the contents of this jar should be used as soon as possible.